


Canyoneering at Zion National Park
Keyhole Canyon, Orderville Canyon, and Pine Creek Canyon
In May 2022, my partner and I set out for a canyoneering adventure in the celebrated Zion National Park. The park is famed for its dramatic canyons, and it was an unforgettable experience navigating through them. Canyoneering offered us an exciting and novel way to escape the bustling crowds that usually flood Zion during peak seasons. It felt like an adventurous twist on hiking - less demanding than rock climbing, yet peppered with exhilarating rope sections to break up the monotony of walking.
Canyoneering can be undertaken either independently, provided you have the necessary technical skills, or through a professional guiding service. Although there's a technical threshold to cross, anyone with even a smidgen of outdoor climbing experience can do it. The required skills are creating an anchor, rappelling, ascending fixed ropes, and locating the path without the aid of marked trails.
Although we were unable to secure a permit for the legendary Angel’s Landing, we had an enjoyable time nonetheless.
Keyhole Canyon
If you're eager to experience the thrill of canyoneering without signing up for a grueling expedition, then Keyhole Canyon is your answer. This bite-sized adventure serves as the perfect introduction to the sport.
Our day began at the crack of dawn as we picked up our permit from the Zion Canyon Visitor Center Wilderness Desk. The ranger there proved invaluable, offering a trove of insights, including the optimal parking spot and beta on the route. My tip? Don't hesitate to pick their brain - it's a goldmine of information.

Following the ranger's guidance, we parked close to the trailhead (approximately here). The first section to the canyon, however, was the main challenge. Descending from "Hoodoo Pass" to the canyon's mouth necessitated careful footwork. My partner and I opted for different paths - I took the left route, and they traversed the right. Both paths had unstable footing, highlighting the need to tread carefully to avoid falling as well as causing erosion.

Once we were within the confines of the canyon, the real adventure kicked off. With easy navigation, small splashy water sections, and three rappels, it was a fun and relaxed way to sharpen our rope management and rappelling skills. By the end of our journey, we found ourselves more comfortable canyoneering and in sync as canyoneering partners.

At the end of this invigorating escapade, a leisurely walk alongside the road leads you right back to your car.
Planning Links:
Orderville Canyon
Without a doubt, this trail emerged as my favorite on the trip. More hiking than canyoneering, this route unveiled awe-inspiring vistas, seclusion from bustling crowds, and even a rendezvous with one of Zion's celebrity trails, The Narrows. If you're looking for a genuine Zion canyon experience without embarking on an exhaustive hike or complex climbing or canyoneering, this trail is your answer.
A day prior, we snagged our permit and set up a shuttle service for our upcoming adventure. The shuttle rendezvous was at their office, from which a 3-hour journey whisked us away to our trailhead. The drop-off location was cross-checked with the shuttle operators, park ranger's counsel and the GPX files sourced online (refer to planning links).


Unraveling over a captivating 11-mile stretch, the trail encompasses a mesmerizing array of landscapes. It kicks off amidst a tranquil pastoral setting, meanders through rugged dirt valleys, before unveiling the iconic red rock canyons that are synonymous with Zion. As you delve deeper into the canyon, the dry, rocky terrain transforms into a muddy stream bed and eventually, cascading waterfalls. The beauty is simply spellbinding.


Each rappel along the path is clearly marked, relatively short and infrequent (there are fewer than 5 rappels). Having lugged a 70m rope, I'd advise carrying a shorter one if available, saving you the hassle of lugging the extra weight around.

From my standpoint, the trail's most challenging portion was the descent at "Veiled Falls" near the end. It was here that my partner navigated down the subtly carved moki steps on the canyon's left (south) side, while I opted for a jump from the top - an epitome of the trail's choose-your-own-adventure spirit.
As you draw closer to the end of the trail, you seamlessly blend with the crowds at The Narrows, adding a new dynamic of bustling crowds and deeper, muddier waters to your journey.
To cap off the day, a shuttle from the Temple of Sinawava takes you back to the Visitor's Center. From there, a leisurely walk gets you back to your parked car the Visitor’s Center or the various tourist offices.

Planning Links:
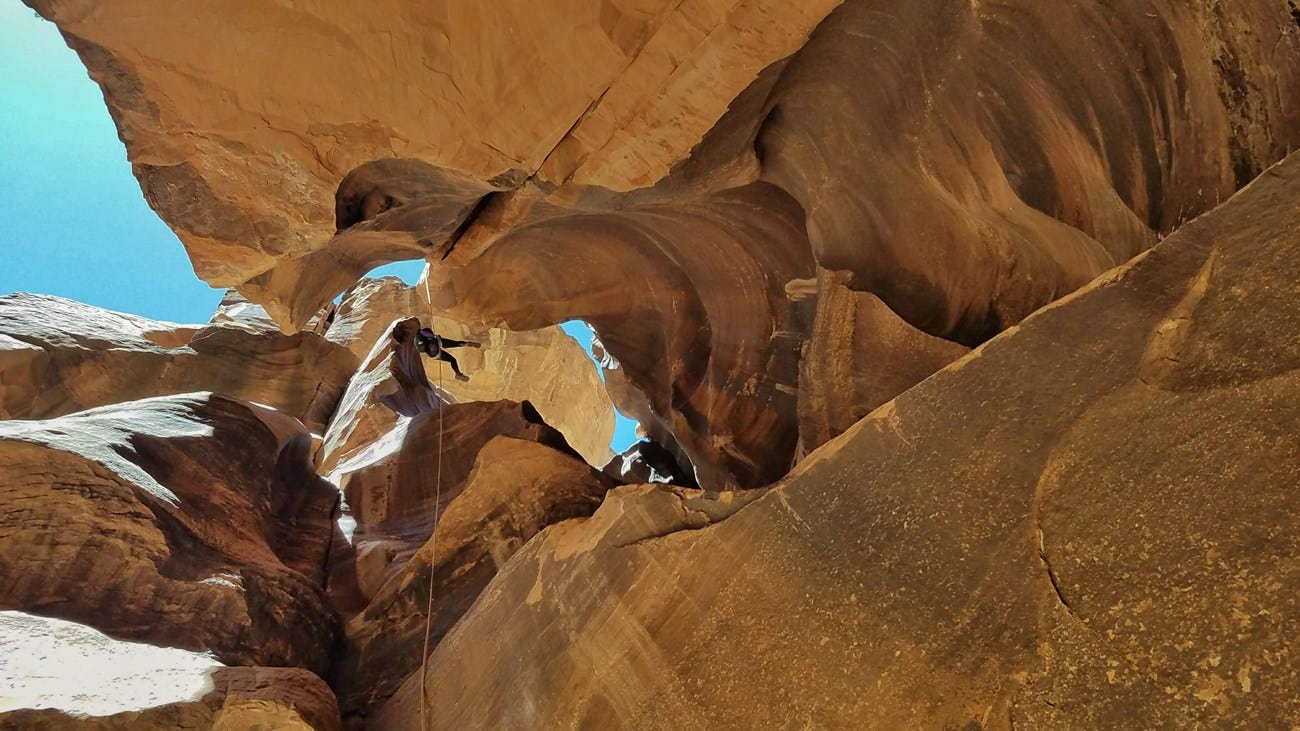
Pine Creek Canyon
Among the routes we did, this one indisputably carries the title of being the most thrilling, if not daunting. One section feature a narrow path in the pitch-dark in waist-deep water. Another section has a long and scenic rappel, the grand finale, that catapults you into an awe-inspiring cave. If that doesn't scare you, I highly recommend this since it feels like a real adventure in one of the most beautiful canyon systems in the world.
Our adventure began at the Visitor Center, where we secured our permit. Following that, we drove to the route's endpoint, tucked away at the second switchback on Route 9 in the main canyon. After parking, we hitchhiked to the starting point of the trail, located just past the tunnel at the Canyon Overlook Trail parking lot.
If you're unsure about the start or end location, ask the ranger when picking up your permit. As for hitchhiking tips, while I'm no seasoned expert, it's appeared to help to be part of a mixed-gender troupe and to look reasonably spruced up (like hitching a ride before the trail, not after).
The rappels are an adventure in and of themselves, and I'd suggest perusing the detailed information in the links below for their specific locations and set-up.
As per my recollection, the initial rappels are quite mellow, with short lengths and straightforward route finding. The third rappel, charmingly named "The Cathedral", presents a majestic descent into an open-air cave reminiscent of a cathedral. It's chilly, so if you are first to descend, find a dry spot outside the water to soak in the stunning view and fully appreciate the unique beauty of the cave.


Past "The Cathedral", be prepared for a fair amount of swimming in sheer darkness, eventually giving way to patches of sunlight and a couple more rappels.


The trail's climax is the infamous "The Grotto", a heart-stopping, lengthy rappel of roughly 100ft. This is where you'll find yourself descending not off a rock, but free-falling into the canyon below. The experience is nothing short of spectacular.


Upon completing "The Grotto", you can pack away your rope and prepare for a short, relaxing walk back to your car."
Planning links:
Trip Preparation
A lot of the below is a repeat of this guide on planning your first backpacking trip but Zion/canyoneering specific. I recommend going through the below and then my other more general guide to make sure you hit on everything.
Permits
Available here. Reservations can be made online during a two-month time frame starting on the 5th day of every month at 9:00am PT, until 3:00pm PT the day before your trip. They're highly sought after and usually get fully booked within minutes of opening each month. Also, remember to factor in the time needed to pick up the permit in person during business hours (Zion Canyon Wilderness Desk operates from 8-5pm, more info here).
Getting there and back
Few trails end where they start and so we did a combination of walking back to the car, taking the public shuttle (schedule is here), hitchhiking and paying for a private shuttle (we used Zion Guru). For each route, I listed how we ended up doing it.
Rappel practice
If you’ve never rappelled before or only done it a couple times, I recommend going to your local crag, putting up a rope and rappelling down a couple times. It will give you confidence with your gear and make sure you and your partner are good at communicating even when you’re far apart.
Trail research
Any time you aren’t going on a marked path, it’s good to read trip report, look at a topographical map (colloquially known as topo) and even watch youtube videos of folks who have done the route before you.
Check conditions
We look up the weather and flash flood warnings but also when you pick the permits they’ll have this information.
Packing List
I owned almost all of the gear we needed but we borrowed wetsuits from friends. It’s also possible to rent quite a few different things in Zion itself. This is a more general post on what to pack for backpacking - below is shorter list highlighting the canyoneering specific equipment for 2 people.
Rope (good to bring two ropes in case you need to ascend but we only brought one)
Wetsuits 2x (you need a wetsuit for the time of year we went, it’s way too cold for a dry suit)
Harness 2x
PSA 2x
Belay device 2x
Presek 2x
4 locking carabiners
2 non-locking
3 slings
Micro Traxion & GriGri (we had these in case we needed to ascend over using ascenders)
Extra webbing
Dry pack for everything
Ziplock bags for paper and phones
Extra charger
Helmet 2x
2-3 liters of water - Bottles are better than water bladders since water bladders can more easily spring a leak.
Snacks
Down jacket
Set of dry clothes
Headlamp
Knife
First aid kits
GPX downloaded on phone